Pages

Project Food Blog Entry #2 - Holy Samosa!

Wow, thank you for voting me through the next round of Project Food Blog!  There are so many talented bloggers out there and I am truly appreciative of the opportunity to advance.

So with not much time to celebrate, it is back to business and moving on to the next challenge.  The second challenge requires us to make a classic dish from another culture.  We were asked to pick an ethnic or foreign classic that is outside our comfort zone or not as familiar with.  I started thinking which ethnic food I love to eat but never tried making it at home.  Well that's easy...Indian food!  The reason why I never make it at home is because my husband isn't particularly fond of Indian cuisine, maybe because some dishes are simply too spicy for him.  I used to have a friend who also loves Indian food and we often dine at Indian restaurants until she moved to Atlanta.  Now I don't eat Indian food that often and miss it terribly.

I also want to make Indian food because one of my first food memories was Indian food. I was about 4 or 5 years old and living in Hong Kong.  There were and still are populated by many Indians.  Many of them arrived there with the British during its colonial rule and became permanent residents.  I recall my dad often took us to an Indian social club on weekends.  Since I was quite young, the only thing I remember is playing in the playground and snacking on samosas.  So in memory of the childhood samosa, I decided to make the classic Indian potato samosa with tamarind chutney.  Tamarind is a fruit popular in South Asian countries.  It has a sweet and sour taste.  This fruit is commonly used in Indian cuisine.  To really challenge myself, I decided to make everything from scratch, but if you want to save time you could use store-bought pastry dough.  For the filling, I also made my own garam masala, a popular spice blend use in Indian cooking, but you could find the already made blend in your local Asian or Indian market.  The same goes to the tamarind chutney.   However if you really want to immerse yourself and learn about the spices of India, you should try the recipes below.  I found all the spices mentioned in these recipes at my local Asian market so you should too.

Indian Potato Samosas
Pastry Dough (yield approx. 30 pieces)
1 1/2 cups all purpose flour
1/2 tspn of salt
1/4 tspn baking powder
1/2 tspn of cumin seeds (lightly crushed)
4 tbsp of butter 
1/2 cup of buttermilk

Potato Filling
1/4 cup of canola oil
1 1/2 tspn of brown mustard seeds
1 tspn cumin seeds
2 jalapeno peppers (fine dice)
1/4 tspn tumeric
Half of a small yellow onion (small dice)
1 1/2 lb of Idaho potatoes (peeled and small dice)
1 tspn of garam masala (recipe follow)
2 tspn of salt
1/4 cup of peas
3 tbsp of cliantro (minced) 
 
Garam Masala (yield 1/4 cup)
1 1/2 tbsp of cumin seed
1 1/2 tbsp of coriander seed
1 tbsp of black peppercorn
1 1/2 tspn of ground cardamom
1/2 pieces of cinnamon stick (crushed)
1 1/2 tspn of fennel seed
1 tspn of ground nutmeg
2 pieces of whole cloves

First work on the dough, mix the flour, salt, baking powder, cumin seed and butter in a food processor.  Then slowly add the buttermilk into the food processor while pulsing until the dough comes together.  Take the dough out, gently press the dough together and wrap in plastic.  Put dough in the fridge for at least 30 minutes to an hour.  Now start working on the garam masala.  

Toast all seeds and cinnamon separately until fragrant.  Let it cool then grind all the toasted and ground spices together.  Since we only need a teaspoon of the spice blend for the filling, you could store the rest for future use.  This spice blend is great for curry as well as tomato and onion based dishes.
While the dough rests, work on the filling.  First put the diced potatoes in a pot and cover with cold salted water.  Bring it all to a boil until it cooks through.  Drain, then set aside.  Heat a saute pan, then heat oil until almost smoking.  Saute the mustard, cumin seeds and jalapeno for about 10 seconds.  Combine the tumeric and cook for a few more seconds.  Then put the onions in and cook until soft.  Next add the potatoes, saute for a few minutes.  Then add the garam masala and peas.  Season with salt then take it off the heat.  Add cilantro at the end.  Let the mixture cool and set aside to fill the samosas.

Tamarind Chutney (yield 1 1/2 cup)
2 tbsp of Indian tamarind paste
1 cup of hot water
1 tbsp of canola oil
1/2 cup of golden raisins
1 tbsp of grated ginger
3/4 tspn of ground cumin
3/4 tspn of ground cinnamon
1/4 tspn of fennel seed
1/8 tspn of ground cardamom
Maple syrup to taste

Mix the tamarind paste and hot water together to dissolve.  Heat the oil in a small saute pan, then saute the raisins and ginger until raisins begin to brown.  Add the spices and cook until fragrant.  Add the tamarind liquid, bring to a boil and remove from heat to cool.  Blend the mixture until smooth.  This is a sweet and sour sauce, if it's too sour add some maple syrup to adjust flavor.

After all the prep work is done, take the dough out of the fridge and begin to roll out the dough.  First flour the board and rolling pin.  Divide the dough into equal pieces.  Roll each piece into a log and cut each log into 7 to 8 pieces.  Cover the cut pieces to prevent from drying out.  Roll each piece into a 7" circle.  Cut out the rolled pieces with a 6" round cutter.  Cut the circles in half to make two semi-circles.  Use a pastry brush dipped in water to moisten half of the straight edge of one semi-circle.  Fold the other half over to form a cone.  Fold the closed edge over 1/4" to seal the seam.  Fill the cone with the potato filling, then moisten the one side of the top edge with water, then press to seal.  Place the samosas on a parchment covered sheet pan and keep them covered with plastic or a damp cloth so they don't dry out.  Heat the canola oil to 375 degrees and fry until golden brown.  Drain on paper towel and serve immediately with the tamarind chutney.

The dough is flaky and the filling is full of the flavor-enhancing spices.  There is a little spiciness to the filling but the tamarind chutney's sweet and sourness really compliment the flavorful filling.  I hope you enjoyed this entry and continue to vote for me!

Project Food Blog Entry #1 - Touch the Heart!

What have I gotten myself into?!  That was my first reaction when I received the details of the first Project Food Blog challenge.  Project Food Blog is an interactive competition that Foodbuzz created.  Foodbuzz is a food blogger community I recently joined, where I met many interesting food bloggers.  Our first challenge requires us to blog about why each contestant thinks he or she has what it takes to be the next food blog star.  It also asks each contestant to describe what makes their blog unique and sets them apart from other bloggers.  These questions caught me by surprise as I have never thought about becoming the next food blog star.  The true reason why I entered is because I wanted to challenge myself as a blogger.  In order to answer these questions, I need to reflect on a deeper level.  So I guess we'll start from the beginning...

I was born in Hong Kong and lived there for the first twelve years of my life.  I grew up in a food-obsessed culture.  Food is the reason to gather.  It is often the subject of conversations.  In my family gatherings, we often speak about what we want for dinner while we're eating lunch.  My grandfather was a big influence on why I love food.  He introduced me to all types of cuisine when I was just a little girl.  I wanted to try everything and became a very adventurous eater.  It was our weekly ritual to meet for family dinners either at home or in restaurants.  Growing up in a diverse city like Hong Kong, we had easy access to various types of cuisine.  In the Chinese culture, we were taught to eat our meals with chopsticks.  So when we visited western restaurants we would use knives and forks.  Eating with a knife and fork was such a special treat to me because it was different and not something we do every day.  As a child, buffet brunch was one of my favorites and we frequented the Peninsula Hotel in Kowloon.  I recalled loving the attentive service and, of course, the food.  I was ecstatic to see the array of dishes displayed in front of me where I could try anything I wanted and as much as I wanted.  I was specifically drawn to the terrine dishes as well as the seafood salads.  Consequently, when we immigrated to the U.S., I adapted the food quickly as I always loved western cuisine.  I grew up with mostly friends of Italian descent and enjoyed Italian food probably more than Chinese food.  Ironically, as I grew older, I found that I longed to learn more about Chinese cookery.  I still have plenty to learn but I try to implement as many Asian ingredients in my recipes and document them on my blog as much as possible.

For this challenge, I made a popular dim sum dish of Pork and Shrimp Shui Mai to demonstrate how I often use Asian ingredients along with western ingredients in my recipes.  Dim Sum means touch the heart.  It is the Chinese version of the small plates or tapas.  Many families gather every Sunday for dim sum brunch as it offers many varieties of dishes and it is great for families to enjoy.  Shui mai (type of dumpling) is one of the more popular dishes.  Instead of using traditional dumpling wrappers, I used zucchini blossoms.  They were one ingredient that I have wanted to use all summer.  Now that summer is coming to an end, I thought I could use them as wrappers and made steamed and fried shui mai. 

Steamed/Fried Pork and Shrimp Shui Mai with Zucchini Blossoms
1/2 lb of ground pork
1/2 lb of minced medium size shrimp (shelled and deveined)
1/4 lb of minced fresh shitake mushrooms
2 tbsp of soy sauce
1 tspn of Shoxing Rice Wine (or dry sherry)
1 large egg white
1 tsp of white pepper
24 zucchini blossoms (male flower without the baby zucchini attached)
Canola oil for frying

Simple Batter for frying
1 egg
1 cup of ice water
1 cup of flour

Mix the first seven ingredients together.  Test a small spoonful of the mixture to ensure the seasoning is right.  Put the mixture in fridge, then start preparing the blossoms for stuffing.  Gently rinse and pat blossoms dry.  Divide blossoms in half, and cut the stems off for the 12 to use for steaming and keep the other 12 with stems for frying.  Carefully open the petal and cut away the pistil with scissors.  After the blossoms are ready for stuffing, use a small spoon to fill each blossom with the mixture.  Steamed dumplings:  fill mixture to the top.  The blossoms should be open so they resemble the traditional dumplings.  Put 12 zucchini blossom dumplings into a steamer and steam for 15 minutes.  Serve immediately.  Fried dumplings:  fill mixture then twist the top close before adding to the batter.  Mix the batter ingredients together.  Heat oil until it reaches at least 350 F.  Dip each stuffed blossom into the batter and slowly drop it into the pot, repeat process.  Fry until golden brown, approximately 5 minutes.  Drain on paper towel, sprinkle salt on top then add a splash of lemon just before serving.

I started this blog as a way for me to continue my culinary journey.  I take great pleasure in creating original recipes and learning food photography.  After much consideration on the questions that were posed by this challenge, of course I believe I have what it takes to be the next food blog star, why not, anything is possible!  As to how my blog differs, I believe my recipes speak for themselves.  I will tackle each challenge to the best of my ability in hope to advance to the next round.  However, in order for me to advance, I also need your votes!  Click on my contestant badge on the upper left hand side and view my profile, follow instructions on how to vote.  Voting opens on 9/20.  Now that my initial competition jitters have subsided, I look forward to the next challenge so buckle up and enjoy this wonderful ride with me!

Egg Custard Tart

As I mentioned before, I'm not a baker and I prefer savory than sweet.  However, ever once in awhile I like to try my hands at baking.  So this time I thought I would go back to basics and make one of the most popular Chinese dessert recipes.  A dear friend of mine has given me some Chinese cookbooks as I thumbed through these books to get recipe ideas,  I found this one by Ellen Leong Blonder.  This recipe is really easy and it takes no time to make.  I did make some changes to the recipe.  For the tart crust, I substitute lard with butter.  I also added some lime zest and nutmeg to the topping of the tart to give it a more distinct flavor.

Egg Custard Tart inspired by Ellen Leong Blonder

Tart Crust
1 cup all purpose flour
1 tbsp of sugar
6 tbsp of butter (cubed and keep cold)
1/4 cup of ice water, plus a few teaspoons if needed

Egg custard filling
2 large eggs
1/2 cup of sugar
1/2 cup of milk
1/2 tspn of vanilla extract
Grated nutmeg
Grated lime zest

Preparing the crust:
When I read the recipe, it reminded me of the tart dough I made in my baking classes.  It was drilled into my head that when making tart crust to be sure to work fast and keep the butter cold.  So after I cubed my butter, I put it in the fridge to keep cold.  Furthermore, put the mixing bowl in the fridge so when it's ready to put the ingredients together, it'll stay cold.  Sift the flour and sugar together in the cold mixing bowl.  Then add the cold butter.  Mix the ingredients with a standing mixer and mix in slow speed.  Then slowly add the ice water.  Once the dough starts to gather, take it out and roll it into a ball.  Try to spend as less time as possible to roll the dough with your hands, as the heat of your hand could warm the butter in the dough.  Then flatten it out, wrap with plastic and put in the fridge.  Let the dough rest in the fridge for at least an hour, preferably two hours.

After the dough is rested, flour the working surface and rolling pin.  Roll the dough out until the dough is about 1/4 inch thick.   You'll see the small pieces of butter in the dough which makes the pie crust flaky.  Gently place it onto your tart tins.   According to the original recipe, she used twelve 3 1/4 inch tart tins.  Since I only had 4 x 1 inch tart tins, I was only able to spread my dough onto 5 tins.  Press the dough lightly into the tin, then refrigerate until the filling is made.

Preparing the custard:
Whisk all ingredients except the nutmeg and zest, let stand 15 minutes.  Preheat oven to 325 degrees.  After 15 minutes, Skim off any bubbles on the custard surface.  Then pour mixture evenly to each tart.  Grate the nutmeg on the top and bake tarts for 30-35 minutes.

After the tarts are baked, let it cool for at least 5 minutes before taking them out of the tart tins.  Transfer to a cooling rack then grate lime zest on top and serve at room temperature.

These egg custard tarts are not too sweet but really satisfy your sweet tooth.  The tart crust is light, buttery and flaky.  You can really taste the eggs in the custard even though there are only two eggs.  The lime zest gives a light citrus flavor which balances really well with the sweet nutmeg.  So if you are a egg custard tart lover, hope you'll try this lighter and easier version.

Braised Beef Short Ribs


Summer is almost over and as a warm weather lover, I'm a bit sad about the impending change of season.  However as a food lover, I look forward to the braised and stewed dishes in the cooler weather.   I have purchased some short ribs for barbecue; however since the last couple of days have been raining, I thought I should just try braising them instead.

Braising is one of the cooking methods I love.  This method is usually used to cook larger and tougher cuts of meat.  It involves using both dry and moist heat.  What I mean is the food is seared or browned in high heat, then add just enough liquid to cover half of the meat then simmer for hours to enrich flavor.  I also love this method because after the long hours of simmering, it leaves you with a wonderful sauce.  For this braised short ribs, I used some Chinese spices such as star anise to enhance the flavor.  There are endless possibilities and most of the braising dishes could be done ahead of time.  You could make this over the weekend and warm it up during the week so there is no need to cook after a long day at work.

Braised Beef Short Ribs (this recipe serves 2)
1 1/2 pound of beef short ribs (4 pieces)
2 small onions (sliced)
3 pieces of scallions (cut in one inch pieces)
3 pieces of ginger (cut 1/4 inch thick)
2 cloves of whole garlic
2 star anise pods
1/2 tspn of light brown sugar
1/4 tspn of Szechuan peppercorns
1/4 cup of Shaoxing wine or dry sherry
2 cups of beef stock or broth
1 large piece of daikon or couple pieces of carrot (sliced 1/2 inch wide)
1/4 cup of Olive oil
Salt and pepper

Pat dry the short ribs and season with salt and pepper.  Heat a heavy bottom pot or a dutch oven,  add half the oil,  seared the meat on both side (a few minutes each side) and set aside.  In the same pot, add garlic, ginger and scallions, saute until fragrant.  Add remaining oil then add onions.  Saute the onions and season with salt and pepper, cook until transparent.  Add the wine and let it cook for a few minutes until the alcohol is cooked through.   Then add beef stock, star anise, peppercorns and light brown sugar.  Put the meat back in the pot and lower the heat and simmer for 2 hours.  Skim the surface with a spoon to get rid of some of the fat.  Then take the meat out, strain the liquid.  Put the meat, daikon (or carrots) back in the pot and cook for another hour until the meat is fork-tendered.  Serve it with mash potatoes, rice, noodles or soak up the sauce with bread.

Whole Wheat Spaghetti alla Carbonara


I love pasta or any type of noodles; it is my ultimate comfort food.  So it was no surprise when I fell in love with this dish many years ago in Rome, it was love at first bite.  The best part, it is so simple to make but so delicious.  I make this sometimes when I'm home after a long work day and don't want to spend hours cooking.   I also find myself making this when I have nothing in the fridge and in between grocery shopping as I usually have eggs, cheese and some type of cured pork product in the fridge.  I try to stick to the traditional recipe, but this time I used whole wheat spaghetti instead. 

Whole Wheat Spaghetti alla Carbonara (Serves 4)
1 lb of whole wheat spaghetti or any long pasta
6 oz of pancetta - diced (if pancetta is not available, substitute with bacon)
1/2 cup of grated Pecorino Romano
1/2 cup of grated Parmigiano Reggiano
2 eggs (preferably at room temperature)
1 tbsp of extra virgin olive oil
Freshly ground pepper
1 tspn of chopped parsley

Bring a large pot of salted water to boil (make sure the water taste like sea water to ensure the pasta is seasoned).  Cook the pasta in the salted water for about 10 minutes or until al dente, do not overcook the pasta.  To prepare the sauce, saute the pancetta with olive oil until it's cooked and the fat is rendered about 5 minutes.  In a bowl, whisk the eggs and cheese together and set aside.  Once the pasta is done, reserve about 1/2 cup of pasta water, drain the pasta and add to the pan with the pancetta, stir well.  Remove the pasta off the heat then add the egg mixture as the hot pasta would cook the eggs, but be sure to add the eggs off the heat so the eggs don't scramble.  Stir the pasta well with the sauce and if you find the sauce is too thick then add the pasta water a little at a time to thin out the sauce and adjust its consistency.  Add the ground pepper and parsley and serve immediately.

I love the creaminess of the egg and cheese sauce that coats the pasta.  It tastes so velvety and along with the crispiness of the pancetta makes this pasta so luscious.  It brings me back to Rome every time I eat this.  If you want a taste of Rome, give this Carbonara a try!

Wild Sockeye Salmon with Mushroom Israeli Couscous Risotto


After months of hearing great things about the newest Fairway that opened in Westchester county, I finally visited this past weekend.  It is a playground for food lovers to touch and smell all the freshest produce,  bake goods, seafood, specialty cheeses and organic products.  The space is enormous and it took me over two hours to comb through each aisle.  The employees there were so nice and attentive.  I definitely plan to visit again in the near future.

While I was at the seafood counter, I immediately was drawn to the bright red color of the wild Sockeye salmon so of course I had to get some.  Since the fillet was so fresh, I wanted to cook it simply.  Then I remembered I had some Israeli couscous at home (wheat-based pasta that shape like round pearls), and a packet of dried mushrooms so I thought I could make a mushroom risotto to serve with the salmon.

Pan-seared Wild Sockeye Salmon (Serves two)
2 4 ounces of wild salmon fillet with skin on
1 tbsp of olive oil
Sprigs of dill for garnish
Salt and pepper to taste 

Mushroom Israeli Couscous Risotto
4 oz of Israeli couscous (1/2 of package)
1 ounce packet of the dried assorted wild mushrooms (porcini, shitake, black and oyster mushrooms or your favorite variety)
3 cups of water
1 tbsp of unsalted butter
1 tbsp of olive oil
1 small onion, diced
1/4 cup of crumbled feta cheese
1 tbsp of chopped dill

Hydrate the dried mushrooms in 3 cups of boiling water, let the mushrooms seep with the heat off for at least 15 minutes.  Strain the mushrooms, reserve the broth and keep warm.  Chop mushrooms into small pieces and reserve.  Add the butter and oil to pan and saute the onion until it's transparent, season with salt.  Add mushroom pieces, saute until tender and season with salt and pepper.  Add the couscous, toast it then add 1 cup of the mushroom broth and cook it like a risotto.  Keep stirring until the liquid is absorbed then add 1/2 cup of the broth.  Repeat steps until the couscous is cooked, about 15 minutes.

When the couscous is almost done, heat a pan with medium to high heat, add olive oil when the pan is hot.  Season the fillet generously with salt and pepper, then once the oil is heated, place the fillet skin side down and press it down gently with a fish spatula so it cooks evenly.  Let the fillet cook until you see the bottom two thirds of the fish color turns from red to pink (about 4 to 5 minutes depending on the thickness of the fish).  Gently turn the fish over and finish cooking the other side for another minute.  Then take the fillet out and let it rest.  To finish the couscous, taste and adjust seasoning.  Then fold in the feta cheese and dill.  Top sprigs of dill on the salmon and serve with the couscous.

The saltiness of the feta and the freshness of the dill compliment well with the intense mushroom flavor of the couscous.  What I love about Israeli couscous is it could be eaten hot or cold.   So if you decide to make more than suggested in this recipe, you could add some baby arugula, lemon juice and olive oil and toss it as a salad for another meal option.

As to the salmon, the crispiness of the skin adds a great texture to the tenderness of the fillet.  It's a full-flavored salmon and it was delicious.  To my surprise, my husband who is not a fish eater devoured his fillet and is now requesting more fish in his diet!

Shrimp and Scallop Cake

I love shellfish especially shrimp and scallops.  I always keep some shrimps in the freezer as fresh shrimps are not always available.  When I need to make a quick dinner, it takes minutes to defrost and takes little time to cook.  This time I want to make a quick snack or appetizer.  If you want to serve this as a main dish, add some salad and this can be a deliciously light meal.  The best part is this can be made ahead of time then heat in the oven the next day.  So if you are expecting guests, these are great to make ahead for entertaining.


Shrimp and Scallop Cake - make approximately a dozen bite-size cakes

1 lb of shrimp any size (peeled and deveined)
1/2 lb of sea scallops
2 large egg white
1 jalapeno (small diced)
1 cup of fresh shitake mushroom (small diced)
Zest of 1 lemon
2 tbsp of lemon juice
1 lemon (cut in wedges)
1 bunch of cilantro leaves
Kosher salt and pepper

Combine the shrimp, scallops and egg white in the food processor.  Process until the seafood are combined and minced.  Then fold in the diced mushroom and jalapeno.  Add lemon juice, zest then season with salt and pepper.  After the seafood is mixed well, cook a little piece of the mixture to test for seasoning.  Once the seasoning is adjusted, heat pan with olive oil.  Use a tablespoon to scoop the mixture and slide the mixture in the pan.  Pan sear each side for 2-3 minutes until it is golden brown.  Do these in batches and do not crowd the pan.  Don't worry if the shape of these cakes are not coming out perfectly round as you can always trim them later.  I actually used a 1/3 measuring cup to round out the cakes and trimmed off the edges.  Top each cake with a cilantro leave for decoration and serve with lemon wedges.

The Heat Is On!

I love the summer; it's my favorite time of the year.  The only thing that I don't like about the summer is the heat interferes with my appetite.  For a food lover, the lost of appetite throws me off balance.  So as the temperatures climbed into the 100's last week, I wanted something fresh and light but pact with flavors that would wake my palate.  I bought some shrimps and squid so I decided to make a simple ceviche that allows me not to spend much time in the kitchen on a hot summer day.

I also want to add some mangoes which is one of my favorite fruits.  Then, I came across some Korean melons aka yellow melons at a Korean produce market.  Since I never had it before and I love all types of melons, with the exception of bitter melons, I thought it may add a hint of sweetness to the ceviche.  The taste of this melon is very similar to cantaloupe but not as sweet.  I also love Chinese celery.  It has a much stronger celery flavor than the regular celery.  It's usually used in Chinese stir-fry.  I though it would add a crunchy texture to this dish.

Shrimp and Squid Ceviche
1 lb of large shrimp (14-16 count) clean and deveined
1 lb of squid (cut in rings)
1 cup of mango (fine dice or brunoise)
1/2 cup of Korean melon (fine dice or brunoise)
1/4 cup of Chinese celery (fine dice or brunoise)
3 lemons (about 1/2 to 3/4 cup of lemon juice)
Zest of 2 lemons
1/2 tspn of Sriracha chili sauce*
1 tbsp of chopped cilantro
Sea salt to taste

Poaching liquid
3 cups of seafood stock
1 tbsp of fish sauce*
6 pieces of sliced ginger
1 bunch of scallions (5-6 pieces white part only)
1 tbsp of Shaoxing wine* (or you can substitute with Sherry)
1 bay leaf
*You can find these ingredients in Asian markets and may also find them in the Asian aisle of your local supermarket.

Put all poaching liquid ingredients in a pot and bring to a boil.  Lower the heat then add shrimp and stir for a minute until just turn pink.  Then add squid, cook for about 30 seconds.  Stir and take it off the heat let the seafood seep in the liquid for another minute; then drain and let cool.  Once the seafood is cool, combine with the remaining ingredients of mango, melon, celery, lemon juice, lemon zest, Sriracha and season with sea salt.  Mix well and refrigerates for at least a few hours.  Add the cilantro just before serving.

The seafood with the fruit and citrus juice taste so light, fresh and delicious!  It's the ideal summer food.  The best part, my appetite is back and the world is perfect again!


Lo lo lo Lola!

As an adventurous-eating child growing up in Hong Kong, I have always loved the taste of ducks.  My favorite has been the traditional Chinese Peking duck with its thinly sliced crispy skin wrapped in a pancake with scallions and hoisin sauce. I especially loved it when the chef comes out with his tall chef hat and carved it table side.  It was so fascinating to me.  Maybe that's why I had fantasized making Peking duck for the grand buffet for graduation but since there was a time constraint, I had to abandon the idea.

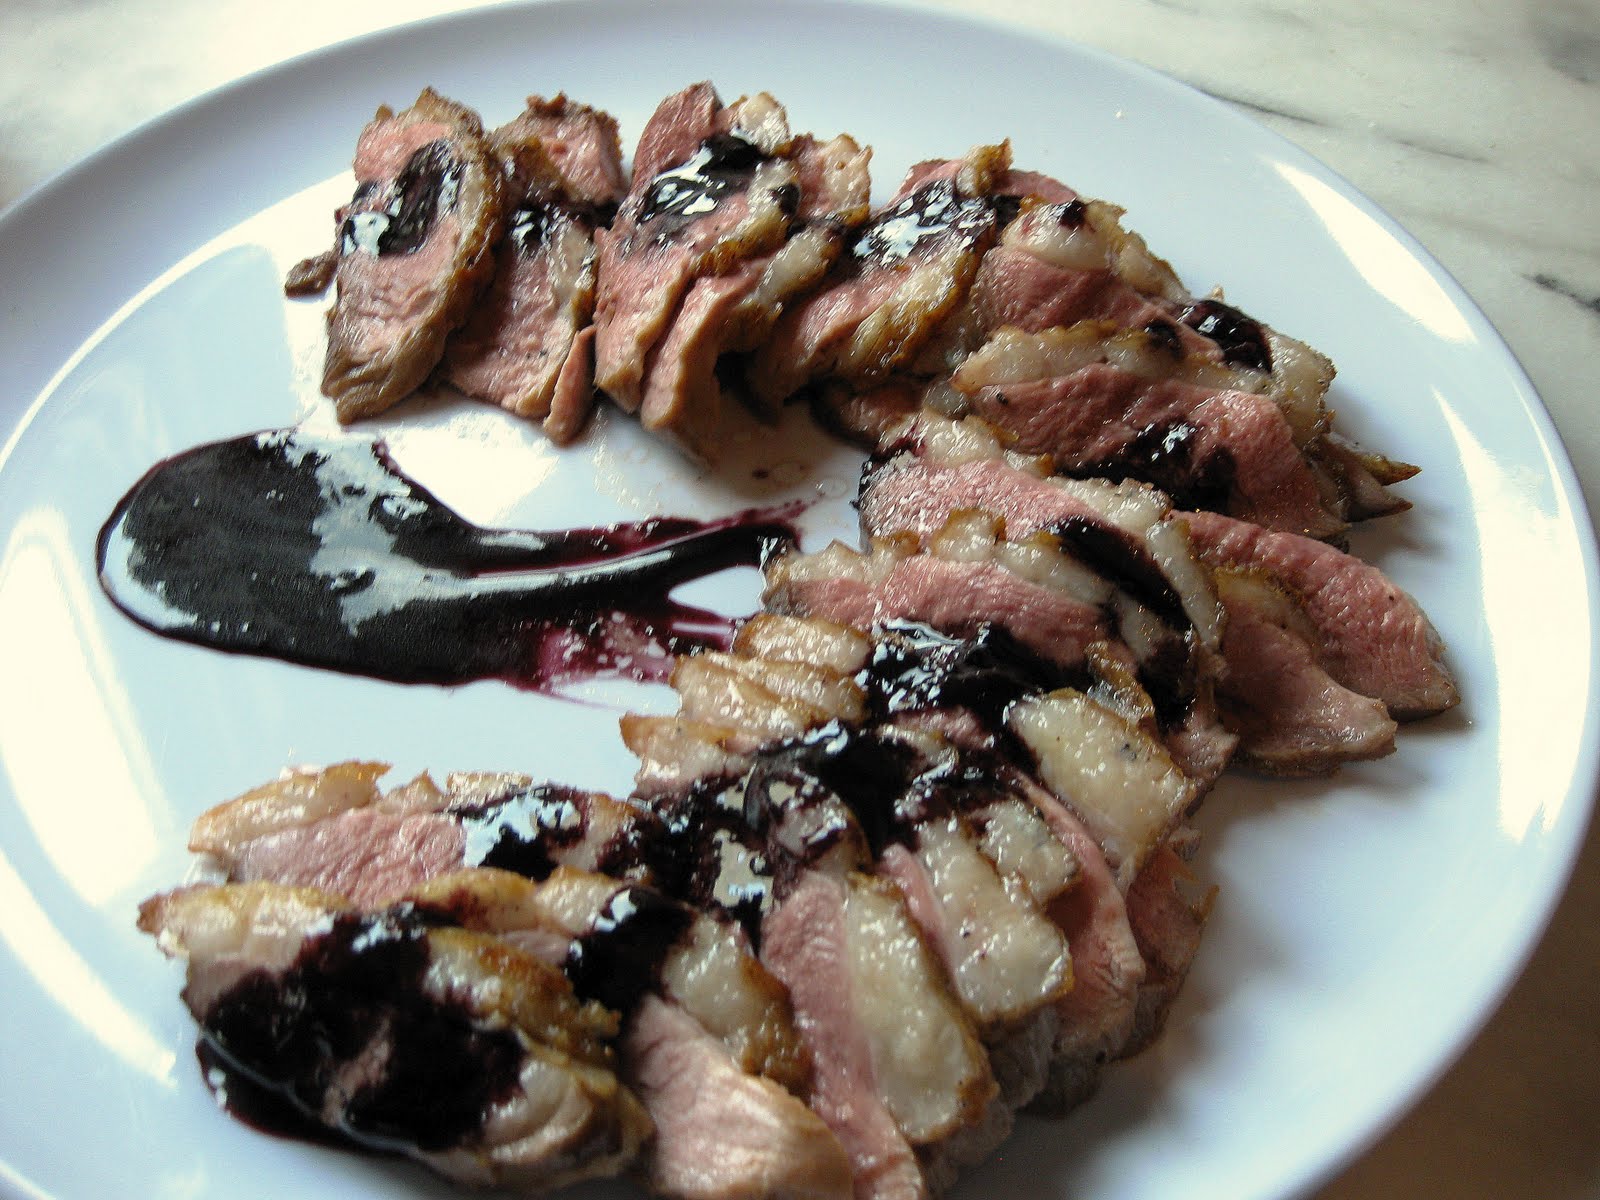
So this week when I arrived at my local farmers market and saw the Hudson Valley Duck Farm was there, I made a bee line toward the booth.  One of the ladies there showed me a new heritage breed called Lola.  She is a cross breed between a Pekin (Long Island) and Mallard.  Unlike the other breed that has a great deal of layer of fat under its skin, Lola has a much thinner layer of fat.  She also said since the fat under the skin was so thin, there's no need to score the skin to render the fat.  As she noticed that I was really interested and declared myself as a duck lover, she went on to say if I love duck then I must try this breed as this is a duck lovers' duck due to its strong duck flavor and its gamier taste.  So of course I was sold!


When I was ready to test this recipe, I wanted to make a sauce to accompany the duck.  I thought since I have some blueberries at home, I'd make a blueberry sauce.  Lately I have been eating a lot of blueberries because of its natural source of antioxidants and its proven health benefits.  It also helped that I had pints at home since there was a sale in my local supermarket that week.  I also wanted to use the Chinese black vinegar made out of black glutinous rice.  It'd give the sauce a balance of sweet and sour and lighten the richness of the duck.  You can usually find this vinegar at your local Asian markets.  If you don't have the black vinegar, you may substitute with balsamic vinegar.  I also want to cook the duck simply with just some salt and pepper so I can really taste the duck flavor.

Pan-seared Duck Breast with Blueberry Chinese Black Vinegar Sauce
2 duck breasts (about 1 1/4 pound)
Salt and pepper for seasoning

Sauce
2 cups of blueberries
1/2 cup of the Chinese Black Vinegar (preferably the Chinkiang brand)
1 cup of chicken stock
1/4 cup of sugar
Salt and pepper for seasoning
1 tbsp of cold unsalted butter 

Combine the blueberries, vinegar and chicken stock in a pot and cook until the liquid comes to a boil.  Lower the heat and add sugar then gently press the blueberries to release the juice to the sauce.  Simmer in low heat until the sauce reduces and thickens.  It should take about 15-20 minutes.  While the sauce is cooking, be sure the duck breasts are pat dried to ensure the skin browns nicely.  Then carefully score the skin in a crisscross pattern.  By scoring the skin makes it easier for the fat to render, even though the lady told me not to score the skin on the Lola as the skin is much thinner, I decided to follow the traditional method when cooking duck breasts.  Heat a skillet with medium heat, season the meat generously with salt and pepper.  Put the skin side down first and let the fat rendered for about 5-6 minutes.  Once the fat is rendered, you may want to gently pour out the fat and save it for another use.  Turn the heat up a bit higher to crisp the skin and cook the meat for another 5 minutes.  When you see the meat is starting to cook through, gently flip over and finish cooking the other side for another 2-3 minutes.  Set the meat aside and tent with aluminum foil.  Let the meat rest for at least 5 minutes before you slice it so it'll stay juicy.  The duck should be served rare to medium rare.  While the meat is resting strain the blueberries, add the butter to thicken the sauce, then add salt and pepper to taste.

The sweet/sour sauce of the blueberries and black vinegar gave the meat a depth of flavor and the simple way of cooking the duck really lets you taste the delicious "red-meat" flavor.  I am so happy to have met Lola as she is definitely a duck lover's duck!


It's all about the BBQ! Part II

After the Big Apple BBQ couple of weeks ago, I have been dying to try out some barbecue recipes.  So when I got a chance to visit my local farmers market this past weekend, I was looking for some ideas.  There I found some organic, grass-fed beef brisket and I was inspired as I remembered the outstanding Hill Country brisket I tasted at the BBQ last weekend.  The Texas-style barbecue beef briskets are traditionally smoked.  Since I don't have a smoker, I thought I should keep it simple and make it in the oven.  I also want to add some Asian flavors to the brisket and a quick no-fuss barbecue sauce.

Beef Brisket with Asian Flavors
4 1/2 lb fresh beef brisket (trimmed but leave about 1/4 inch of fat cap on top to keep the meat moist)
2 cups of beef stock or broth
1 bunch of scallions (cut each piece in half)
12 slices of fresh ginger root

Dry Rub
1/4 cup of Chinese five spice powder*
1/4 cup of cumin
2 tbsp of garlic powder
1 tbsp of kosher salt
1/2 tbsp of fresh cracked pepper

Barbecue sauce
1/2 cup of ketchup
1/2 cup of Hoisin sauce*
1/4 cup of rice vinegar*
1 tbsp of Sriracha chili sauce*

*You can find these ingredients in Asian markets and may also find them in the Asian aisle of your local supermarket.

Combine the first three ingredients of the dry rub recipe thoroughly, and then generously rub the spices onto the beef brisket.  Wrap tightly and refrigerate overnight.  Next day preheat oven to 350.  Before putting the brisket in the oven, season the brisket with salt and pepper.  Put the scallions and ginger on the bottom of the roasting pan, sit the brisket (fat side up) on top of the scallions and ginger slices.  Roast it for 1 hour until it starts to brown.  In the meantime, warm up the stock or broth.  After an hour of roasting, slowly add the warm stock to the pan until the bottom of the pan is covered with the liquid.  Then cover the brisket with foil and lower the heat to 250 and slowly roast it for another 4 hours.  Baste the brisket with the pan liquid every hour and add more liquid if needed.

To prepare the no-fuss barbecue sauce, combine all ingredients and cooked for 15 minute in low to moderately low heat until it thickens and combine well.
  
After roasting the brisket, take the foil off and put the brisket under the boiler for a few minutes to crisp up the fat on top.  This adds a smoky flavor to the spices but be careful not to put it under the boiler too long; otherwise it'll burn.  Take out the brisket then cover with foil and let it rest for at least 30 minutes before slicing it thinly against the grain.  To slice against the grain means if the lines (fiber) of the meat are going one way then you should slice it the other way so you're cutting short of the fiber and the meat are more tender and less chewy.  You should use this technique for tougher cuts of meat such as flank steaks and rump roast.  The brisket can be eaten in a sandwich or by itself top with some barbecue sauce.

It was fun and delicious for my first attempt.  The crust of the brisket had a smoky five-spice flavor and the meat was fork-tenderly moist.  The no-fuss barbecue sauce had a balanced of sweetness, sourness and spiciness.  It definitely is an easy sauce to make, so make extra and keep it in the fridge so you can add it to your grill chicken and shrimp dishes or use it as a marinate!

Related Posts Plugin for WordPress, Blogger...